0. Introduction
☀ The weather is nice, perfect for reinstalling a dual boot (Windows 10 + Arch Linux (KDE)) on my personal laptop, the ThinkPad T470p. Here’s a system info screenshot from Arch Linux:

Currently, there are two storage drives: a 500GB HDD and a 250GB SSD. Both systems are installed on the SSD, while the HDD is used as a data storage drive for both systems. First, the Windows system is installed, followed by Arch Linux. The disk space allocation is as follows:
| Disk Type | Windows 10 | Arch Linux |
|---|---|---|
| 500G HD | 140G for application data | Remaining (approx. 325.76GB) for user home directory /home |
| 250G SSD | 500M EFI, 50M MSR, 100G OS | Remaining (approx. 137.94GB) for root directory / |
1. Installing Windows
1.1. Preparing the Windows System Image
Choose any version of Windows that you prefer:
Download URL:
Win10 image ed2k link:
- Windows 10 (business editions), version 1909 (updated Jan 2020) (x64) - DVD (Chinese-Simplified)
- Windows 10 (consumer editions), version 1909 (updated Jan 2020) (x64) - DVD (Chinese-Simplified)
- Windows 10 21H1 Simplified Chinese Multi-Edition Official Original Clean Image Download
1.2. Create a Bootable USB Drive (Using Rufus)
Use Rufus (Linux users can use dd) to create a bootable USB drive. Select the Windows 10 ISO image, set the partition scheme to GPT, and the target system type to UEFI. Leave other options as default, then click “Start”.

1.3. Configure the BIOS
Insert the USB drive and restart the computer. Enter the BIOS settings menu:
- Disable Secure Boot in the motherboard settings.
- Set the boot mode to UEFI (UEFI Only).
1.4. Access the Boot Menu (Custom Installation)
After restarting, when you see the boot screen, press F12 repeatedly (or the key specific to your device) to enter the boot menu. Follow the on-screen instructions until you reach the installation type selection screen. Choose “Custom” at this stage.

1.5. Disk Partitioning
Press Shift + F10 to open the Command Prompt window.
(1) Enter diskpart mode:
1 | Open Microsoft DiskPart partition tool |

(2) Clear partitions on Disk 0 (Warning: This will format the disk. Please back up important data in advance)
1 | Select Disk 0 (500GB hard drive) |

(3) Clear partitions on Disk 1 (Note: This will format the disk. Please back up important data in advance)
1 | Select disk 1 (250G SSD) |

(4) System Partition
1 | Select disk 1 (SSD) as the system disk |

1 | Confirm the current disk |

1.6. System Installation
After completing the partitioning, in the Windows installation location selection screen, click “Refresh” to display the result of the partitioning done through the command line, as shown in the following image:
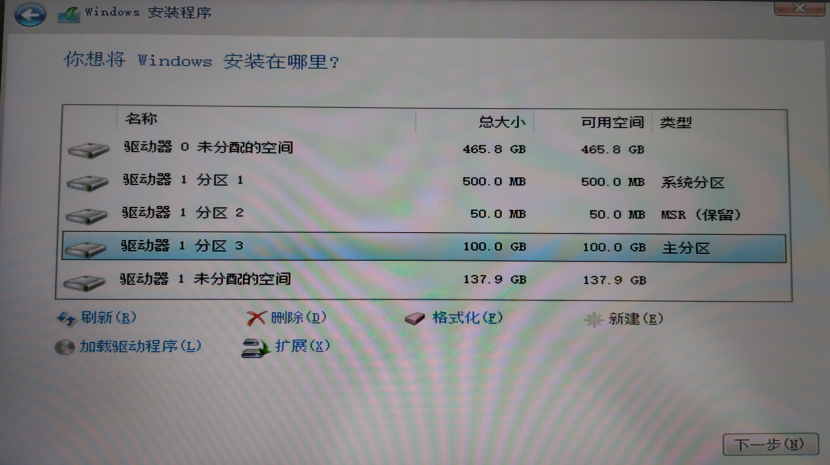
Select “Drive 1 Partition 3” (the 100G space for system installation), and click “Next” to begin the Windows installation.
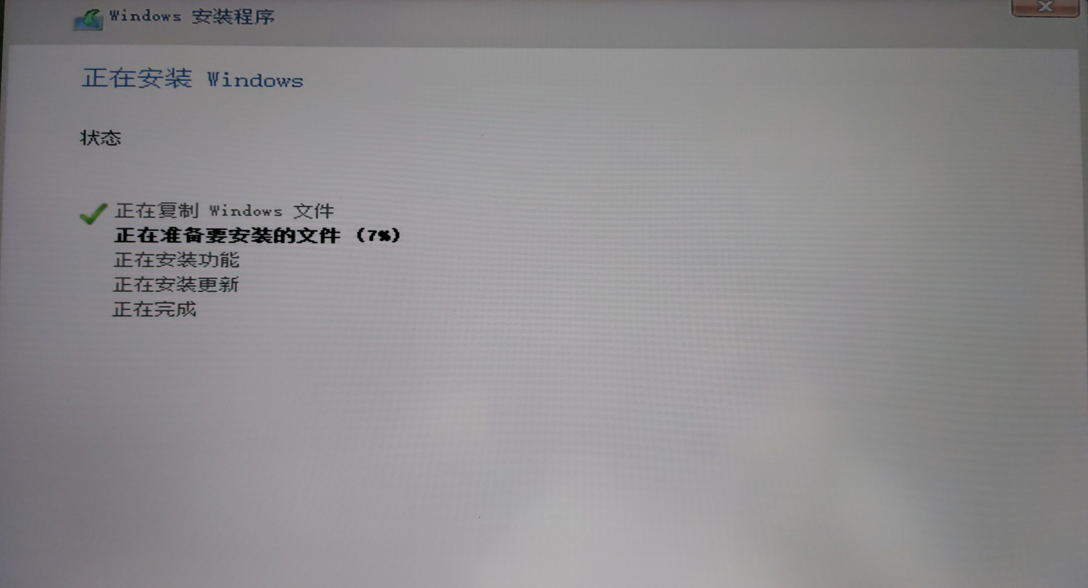
1.7. Installation Success
After the system is installed, it will automatically restart. At this point, you can remove the USB drive.
After rebooting, a series of configurations will take place, which will not be elaborated here.
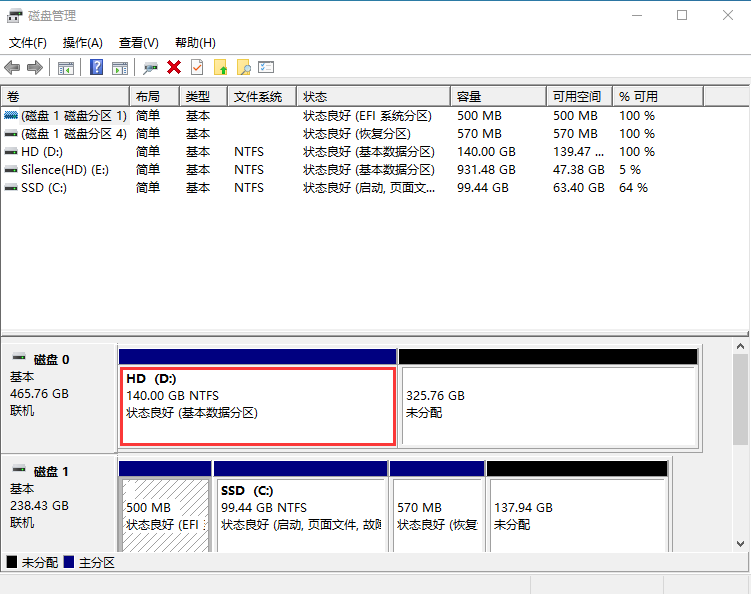
After installation is successful, go to the Disk Management interface and allocate 140G from the 500G HD disk for personal application data storage, as shown in the following image:
2. Install Arch Linux
When installing Arch Linux, you can refer to the official Arch Linux installation guide as the primary resource, with this document as a supplementary reference.
2.1. Prepare Arch Linux Image
You can visit the Arch Linux Downloads official website to choose and download the latest system package:
- Download website: Arch Linux - Downloads
- Magnet link for the image (2021.10.01 version, it is recommended to choose the latest version): Magnet link for 2021.10.01
2.2. Create Bootable USB Drive (Using Rufus)
Select the Arch Linux iso image, use UEFI + GPT, and click Start to begin the writing process.
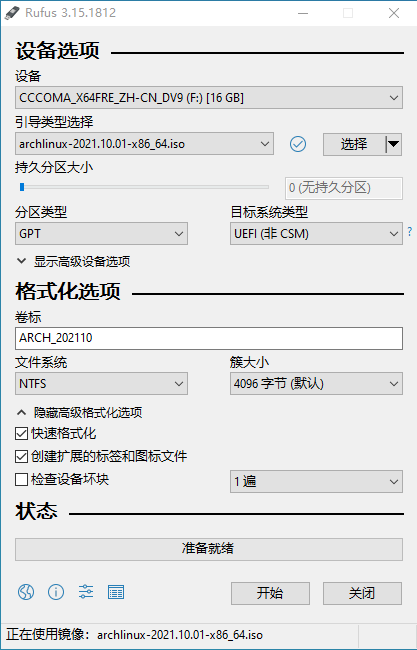
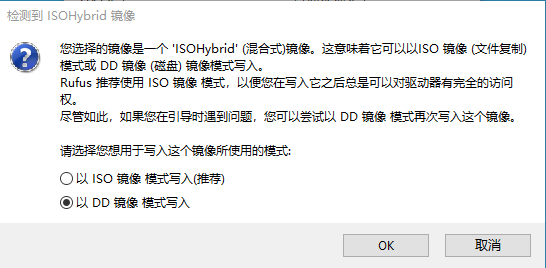
When clicking Start, select “Write in DD image mode”:
2.3. Boot into Live Environment
After restarting, when you see the boot screen, press F12 (this may vary depending on the machine) to enter the boot menu, usually selecting the first option by default.
When you see the following screen, it means the boot was successful.

2.4. Verify Boot Mode
1 | If the result shows directories without errors, the system is booted in UEFI mode. Otherwise, it may be booted in BIOS mode. |
2.5. Disable Reflector
1 | Disable reflector to prevent updating the mirrorlist automatically |
2.6. Connect to Network
You can first check if the wireless device is disabled:
1 | Check the wireless device status |
Use iwctl to connect to a wireless network:
1 | View network device information |
For a wired connection, theoretically, just plug in the network cable, and you should be able to connect to the internet directly.
2.7. Update System Time
1 | root@archiso ~ # timedatectl set-ntp true |
2.8. Create Disk Partitions
(1) View Disk Information
1 | View Disk Information |
lsblk displays as shown in the following image:
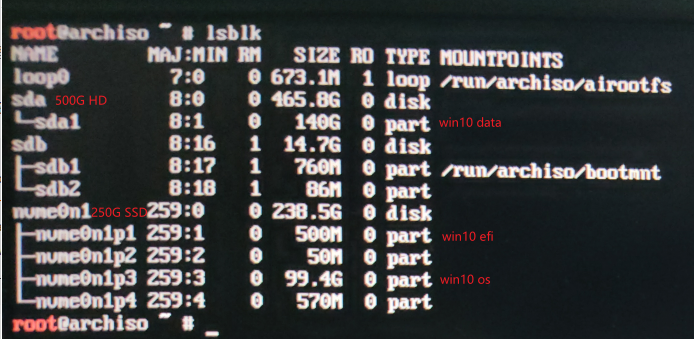
- sda is a 500G hard drive, with 140G of sda1 used as the Win10 personal application data storage partition, and the remaining space allocated for the Arch Linux user home directory
/home; - nvme0n1 is a 250G SSD, with 500M of nvme0n1p1 used for the Win10 EFI, 50M of nvme0n1p2 for the Win10 MSR, 99.4G (approximately 100G) of nvme0n1p3 for the Win10 system partition, nvme0n1p4 for the Win10 recovery system partition, and the remaining space allocated for the Arch Linux root directory
/.
(2) Create/Format/Mount Root Directory
1 | root@archiso ~ # cfdisk /dev/nvme0n1 |
- Create Partition: Use the down arrow key to select the row at the bottom of the Device list that shows “Free space.” Choose “New” and press Enter. The “Partition size” at the bottom left will automatically fill with the current maximum available space on the disk (which can be modified). After confirming the partition size, press Enter.
- Write Partition: Select “Write” and press Enter, then type yes to confirm writing the partition to the disk.
- Exit cfdisk: Select “Quit” to exit.
At this point, you can use lsblk to view the newly added partition, such as a new partition nvme0n1p5 under nvme0n1.
- Partition Formatting:
1 | Format the newly created partition to ext4 format. Ensure the partition number is nvme0n1p5. |

- Mount Partition:
1 | Mount the root partition to `/mnt` |
Note: When mounting partitions, it’s essential to follow the correct order: first mount the root partition (to /mnt), then mount the boot partition (to /mnt/boot or /mnt/efi, if it’s separated), and finally mount any other partitions. Otherwise, you may encounter issues with booting the system after installation.
(3) Create/Format/Mount User Home Directory
1 | root@archiso ~ # cfdisk /dev/sda |
Create and write partitions as described above.
At this point, you can use lsblk to view the newly added partition, such as an additional partition sda2 under sda.
- Partition Formatting:
1 | Format the newly created partition as ext4, ensuring the partition number is sda2 |
- Mounting the Partition:
1 | root@archiso ~ # mkdir /mnt/home |
(4) Mount EFI
Since it’s a dual-boot installation, the EFI partition for Arch Linux shares the one used by Windows.
1 | root@archiso ~ # mkdir /mnt/efi |
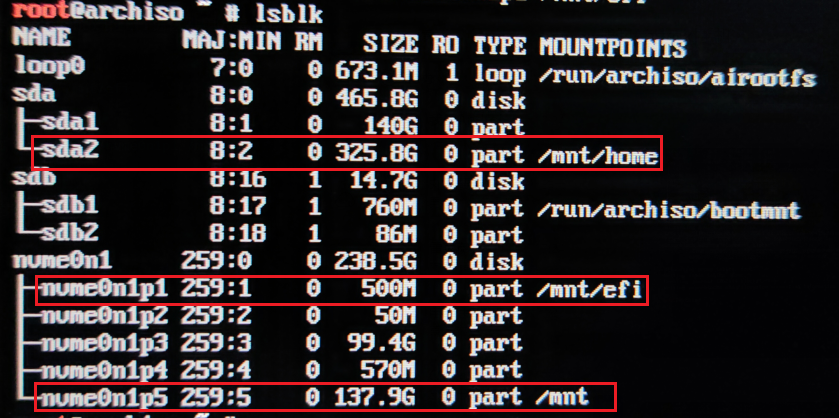
(5) Confirm All Mounting Status
2.9. Install the Basic System
Before installation, consider changing to a domestic mirror source to speed up download speeds, such as USTC or Tsinghua. (For Chinese user!)
Use vim /etc/pacman.d/mirrorlist to modify the mirror sources, adding the following lines at the top:
1 | # Tsinghua University |
Update the package cache:
1 | root@archiso ~ # pacman -Syy |
Install the base packages:
1 | Install the base software package, Linux kernel, and firmware for common hardware |
2.10. Generate the fstab File
1 | root@archiso ~ # genfstab -U /mnt >> /mnt/etc/fstab |
2.11. Chroot
1 | Change root to the newly installed system |
2.12. Set the Time Zone
1 | Set the time zone |
2.13. Set Locale
1 | [root@archiso /]# vim /etc/locale.gen |
Find the lines for en_US.UTF-8 UTF-8 and zh_CN.UTF-8 UTF-8, remove the # at the beginning of each line, and save and exit.
1 | Generate locale information |
Create and write to the /etc/locale.conf file: vim /etc/locale.conf
Add the following content: LANG=en_US.UTF-8
Exit and save.
2.14. Set the Hostname
Create and write the hostname: vim /etc/hostname
Add the following content (modify as needed): utopia
Modify the hosts file: vim /etc/hosts
Add the following content:
1 | 127.0.0.1 localhost |
Exit and save.
2.15. Set the Root User Password
Create a password for the root user:
1 | [root@archiso /]# passwd root |
2.16. Create the Bootloader
- Install Microcode:
If you’re unsure of your CPU model, you can installpacman -S neofetchto check your computer’s CPU model.
1 | For Intel CPUs, install intel-ucode |
For UEFI boot mode, you need to install both grub and efibootmgr:
1 | grub is the bootloader, and efibootmgr is used by grub scripts to write boot entries to NVRAM |
Grub 2.06 update requires user intervention for os-prober:
- If you are using os-prober to generate boot entries for other systems, grub 2.06 no longer automatically enables os-prober. You need to add
GRUB_DISABLE_OS_PROBER=falseto the /etc/default/grub configuration file and re-run grub-mkconfig.- Grub 2.06 will now automatically add firmware setup menu boot entries, eliminating the need to create them manually.
Given this, you need to manually enable os-prober to ensure Windows is correctly recognized:
1 | [root@archiso /]# vim /etc/default/grub |
Find an empty line and add: GRUB_DISABLE_OS_PROBER=false, then save and exit.
1 | Install the GRUB EFI application grubx64.efi to /efi and its modules to /boot/grub/x86_64-efi/ |

2.17. Complete the Installation
Exit the new system and unmount:
1 | Exit arch-chroot |
After rebooting, log in with the root user and password.
Connect to the network:
1 | Start DHCP immediately |
3. Arch Linux Desktop Environment and Common Applications
3.1. Set Up the archlinuxcn Repository and Install yay
1 | Modify /etc/pacman.conf and add the following at the end: |
The AUR is a software repository maintained by the Arch Linux community. The official address is: AUR (en) - Home (archlinux.org).
You can use AUR software through yaourt (previously popular but now discontinued) and yay (currently the preferred option).
3.2. Add a Non-root User (Set Up a Personal Account)
1 | The wheel group can use sudo for privilege escalation. -m creates the user's home directory, and ray is the username (set as needed). |
3.3. Install Dual Graphics Card Driver
(0) Check Graphics Card Devices:
1 | Check graphics card information |
(1) Install xorg:
1 | Essential for graphical interface |
It is recommended to use open-source drivers for all AMD graphics cards and closed-source drivers for NVIDIA graphics cards.
(2) Installing Intel Graphics:
1 | [root@utopia ~]# pacman -S mesa lib32-mesa vulkan-intel lib32-vulkan-intel |
Intel Graphics Wiki: Intel graphics - ArchWiki (archlinux.org)
Arch Wiki generally does not recommend installing xf86-video-intel, but instead using xorg’s modesetting driver (more stable).
Note: Only Intel HD 4000 and above integrated graphics support Vulkan.
(3) Installing NVIDIA Graphics Card:
1 | For GeForce 930 and above, 10 series to 20 series, Quadro / Tesla / Tegra K-series, and newer GPUs (NV110 and newer GPU families), install the nvidia package (for linux package) or nvidia-lts package (for linux-lts package). |
NVIDIA Wiki: NVIDIA - ArchWiki (archlinux.org)
(4) Installing Switchable Graphics Tool:
1 | [root@utopia ~]# yay -S optimus-manager optimus-manager-qt |
optimus-manager provides three modes: dedicated GPU only, integrated GPU only, and hybrid dynamic switching mode.
After installation, simply restart to use. Upon installation, optimus-manager will automatically enable its service. You can check its status before rebooting; if not enabled, you can
sudo systemctl enable optimus-manager.Reference:
3.4. Installing Graphic Interface - KDE Plasma
3.4.1. Installing KDE Desktop
1 | Install the plasma-meta meta package |
- KDE wiki: KDE (Simplified Chinese) - ArchWiki (archlinux.org)
- The difference between meta package (such as plasma-meta) and package group (such as plasma) can be found here: Meta package and package group (Simplified Chinese) - ArchWiki (archlinux.org)
plasma-meta: Meta package that installs software packages through dependencies. If new software packages are added later, they will be automatically installed during updates; users cannot choose to install only a part of the software that the meta package depends on.
plasma: Package group that is just a list, providing similar functionality to plasma-meta. If new software packages are added later, they will not be automatically installed during updates; users can choose to install some software in the group or choose to only remove some software from the package group.
After rebooting, you can enter the KDE graphical interface. For more information on using KDE, you can refer to KDE UserBase.
3.4.2. Network Setup and Connection
After completing the reboot and entering the desktop by entering the user password, open the konsole command terminal to configure the network settings.
1 | Ensure that iwd is disabled at boot as its wireless connections may conflict with NetworkManager |
3.4.3. Setting Up Swap File
In a desktop environment, a swap partition or file is used to implement hibernation, which saves the current environment to a swap file or partition on disk. The performance of swap files and partitions is similar, but swap files are more flexible, allowing for changes in size, addition, and deletion at any time.
1 | Create 16G of swap space, size can be adjusted as needed |
Finally, append the following content to /etc/fstab: /swapfile none swap defaults 0 0
KDE itself provides an out-of-the-box suspend function, which suspends the system to memory, consuming only a small amount of power. Hibernate will suspend the system to a swap partition or file, consuming almost no power.
Hibernate function: Power management/Suspend and hibernate - ArchWiki (archlinux.org)
3.4.4. Install KDE Applications
Here is the translation, keeping the format intact:
3.4.4. Install KDE Applications
1 | Install the KDE application package repository: such as kde-applications or kde-applications-meta, you can also choose to install: |
The above are optional installations. Alternatively, you can choose to install the full KDE suite. The kde-applications-meta / kde-applications package includes a variety of software, and while it offers a comprehensive set of applications, it also means the space usage after installation is quite large. It is generally not recommended to install it, and you can choose to install selectively based on your actual needs. For the difference between a meta package and a package group, refer to: Meta package and package group
1 | meta package |